Saving
an R data file
As you work with your data in R you will eventually want to save it to
disk. This will allow you to work with the data later and still retain
the original dataset. It can also allow you to share your dataset with
other analysts.
Before
learning how to save a dataset in R, it is a good idea to create an
example dataset. The following R script creates an R data frame
[explained in another
topic of this learning infrastructure] for you to practice saving.
x
<- c(1:10) # create a numeric vector
y
<- c(11:20)
# create a numeric vector
z
<- c(21:30)
# create a numeric vector
m
<- cbind(x,
y, z) # create a matrix
d
<- as.data.frame(m)
# create a data frame
#
create a text vector
t
<- c("red",
"blue", "red", "white", "blue", "white", "red","blue", "white", "white")
df
<- cbind(d,
t) # add the text vector to the data frame
Your
R session now has a data frame object named df that you can use
for the exercises below.
R
dataset files
One
of the simplest ways to save your data is by saving it into an RData
file with the function save( ). R saves your data to the working
folder on your computer disk in a binary file. This storage method is
efficient and the only drawback is that, because it is stored in an R
binary format, you can only open it in R [there are some exceptions that
will not be discussed here].
You
can save the data frame df [from the above example] using this
command:
save(df,
file = "df.RData")
While
the save( ) command can have several arguments, this example
uses only two. The first argument is the name of your R data object, df
in this example. The second argument assigns a name to the RData
file, df.RData in this example. You can use any text as your
file name as long as it does not contain any embedded spaces. While you
do not have to use the .RData extension, this is a recommended
practice because the .RData extension will help RStudio to
identify your R datasets. Notice that the file name is enclosed in
quotation marks.
Try
to save your data frame using the save( ) command. Another topic in this learning
infrastructure addressed how to load a R dataset into R so that will not
be covered here.
Text
files
There
are other options for saving your data from your R session. You can save
your data as text file. One advantage of saving your data into a text
file is that you can open it in another application, such as a text
editor or Excel, and work with it there.
The
simplest way to save your data into a text file is by using the write.csv(
) command. You may recall from the learning infrastructure
topic about reading data files that a csv file is a text file that uses
commas to separate each item of data form the other items of data. You
can experiment saving the data frame df using the
command:
write.csv(df,
file = "df.csv")
While
the write.csv( ) command can have several arguments,
this example uses only two. The first argument is the name of your R
data object, df in this example. The second argument
assigns a name to the csv file, df.csv in this
example. You can use any text as your file name as long as it does not
contain any embedded spaces. While you do not have to use the .csv
extension, this is a recommended practice. Notice that the file name is
enclosed in quotation marks.
If
you open df.csv in a text editor, you will see
"","x","y","z","t"
"1",1,11,21,"red"
"2",2,12,22,"blue"
"3",3,13,23,"red"
"4",4,14,24,"white"
"5",5,15,25,"blue"
"6",6,16,26,"white"
"7",7,17,27,"red"
"8",8,18,28,"blue"
"9",9,19,29,"white"
"10",10,20,30,"white"
Notice
that each item of data is separated from the other items of data with a
comma and the header row of column titles is included. Another thing you
may notice are the numbers enclosed in quotes in front of every line.
This will be discussed below.
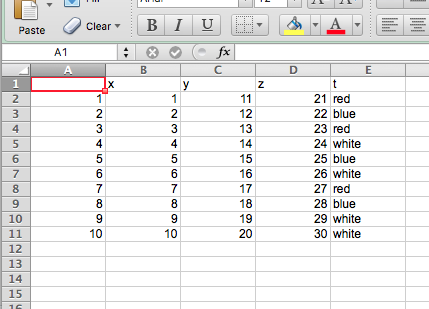
If
you open df.csv in Excel, you will see
In
both cases, your data is available for you to work with as text. The one
issue is the fact that your export of df included the
line numbers. This can be corrected by adding a third argument to your write.csv(
) command. If you save your data object using this command
write.csv(df,
file = "df2.csv", row.names = FALSE)
It
will save df without the line numbers. Notice that
the data object is saved as df2.csv this time. A
different name was used so you can compare the two csv files later.
If
you open df2.csv in a text editor, you will see
"x","y","z","t"
1,11,21,"red"
2,12,22,"blue"
3,13,23,"red"
4,14,24,"white"
5,15,25,"blue"
6,16,26,"white"
7,17,27,"red"
8,18,28,"blue"
9,19,29,"white"
10,20,30,"white"
The
first column of line numbers is not in df2.csv.
Everything else looks like df.csv.
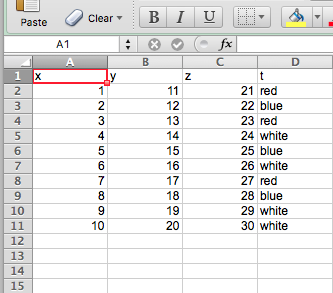
If
you open df2.csv in Excel, you will see
Again,
this looks like the df2.csv Excel worksheet without the line numbers.
You
can export your R data object using other R functions. One example of
this is the function write.table( ). These functions
will not be discussed here, but references to them are easily found on
the Internet.
Working
with Excel files in R
You
can export your R data object as an Excel spreadsheet using functions in
the xlsx R package. You will need to manually install
this package because the RStudio package manager will not do it. To
install the package, enter this command in the command console
install.packages("xlsx")
This
will install the packages and its dependencies. You will find the
package in the Packages panel of RStudio. Check the box next to the
package to load it for use in your R session. This package will enable
you to read and write directly into and out of Excel files from your R
session. A good reference for this package can be found at
If
you work with your text data file in Excel, you can export it as a csv
file and easily import it into your R session as discussed in another
learning infrastructure topic.
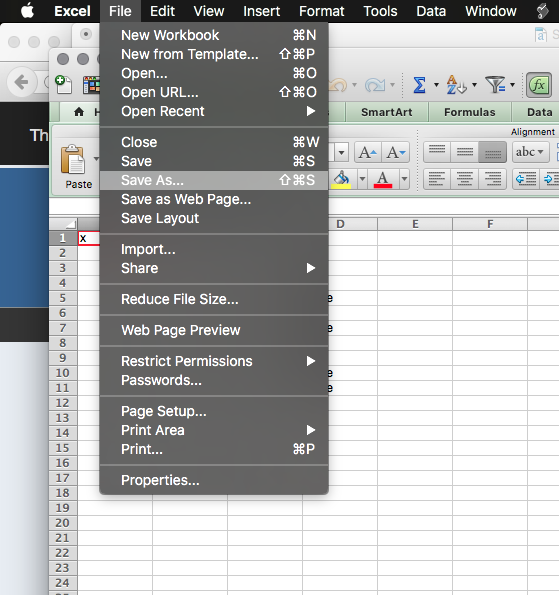
You
can easily save an Excel worksheet as a csv file. In Excel, open the File
menu and click Save As. [note: this example
uses Mac Excel screen shots, Windows Excel will act similarly]
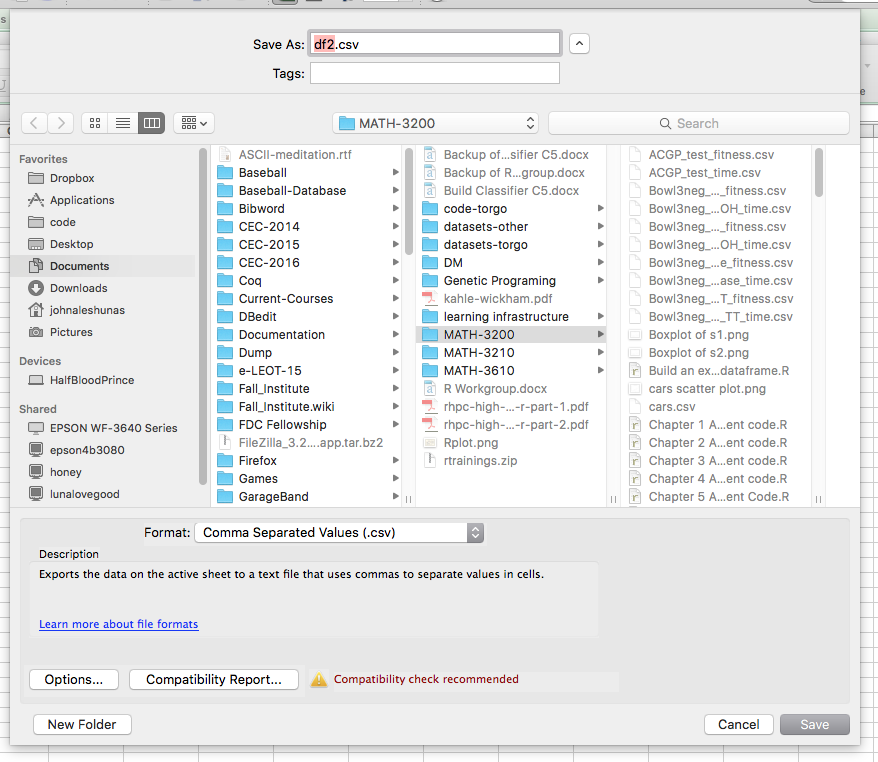
The
File Save As dialog will open
Enter
the name that you wish to use for your file in the file name box at the
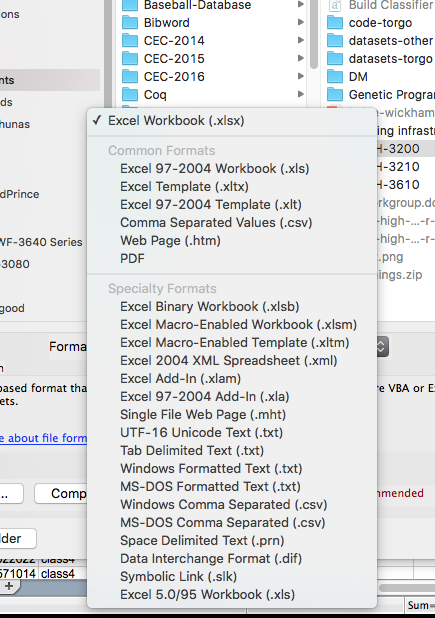
top of the dialog. Next, go to the File Format box below the folder
directory and open the list. You can now choose the MS-DOS Comma
Separated (.csv) format.
Click
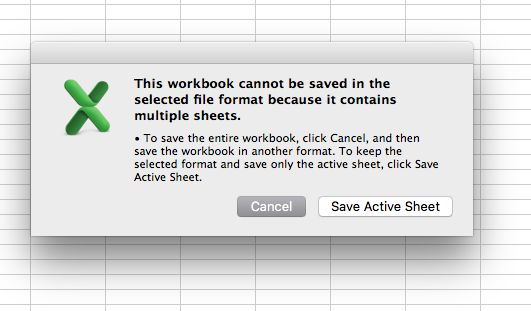
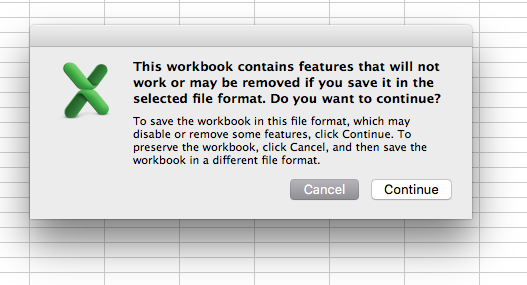
the Save button. If you are exporting an Excel
spreadsheet, you will encounter two warning dialogs. They will look like
this
In
the first warning dialog, click Save Active Sheet. In
the second warning dialog click Continue. Excel will
now save your data into a csv file.
